Everything you need to know about your EV charger.
+ Understanding your charger
Controls & indicators
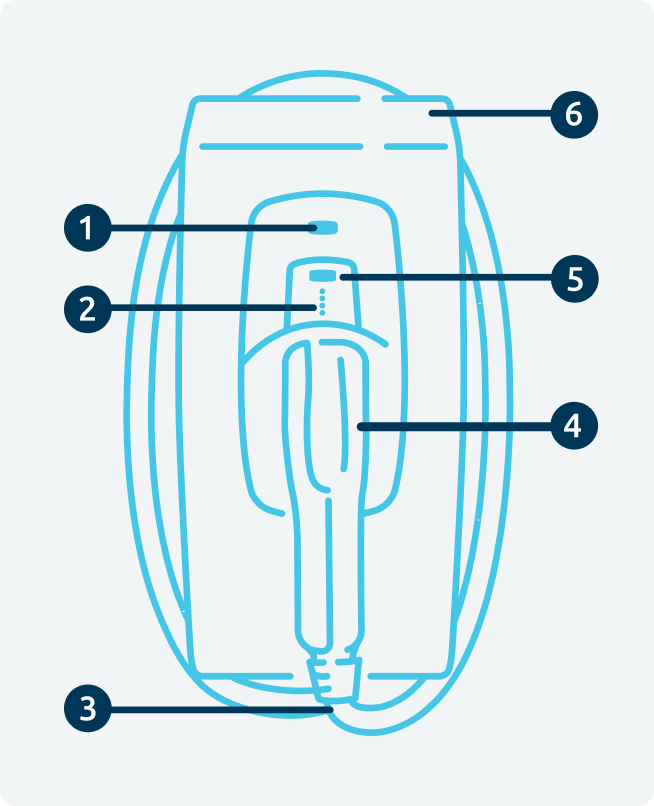
No.
Feature
- 1
Indicator light. This tells you what mode your charger is in.
- 2
Charging status lights. These tell you if your EV is currently charging.
- 3
Charging cable (only for tethered chargers).
- 4
Charging gun holster (only for tethered chargers). Your charging gun should be safely stowed here when not in use.
- 5
Boost button. Press this to start or stop boost mode for immediate charging.
- 6
Integrated cable storage. Simply wrap your cable around the charger when it’s not in use.
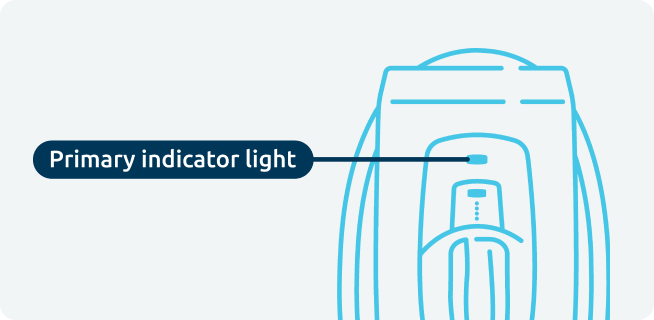
The indicator lights
Your charger has several differently coloured LED lights, which quickly help you to see your charging status. The main light at the top is the Primary Status LED, which will tell you the operational state and mode.
Primary indicator lights and what they mean
Light Colour
What it means
- White
The charger is online and connected to the charging platform.
- Blue
Boost mode. You have overridden any scheduled charge to start charging immediately.
- Yellow
Solar Match mode. The charger is ready to use power from your solar panels, once there is solar power available.
- Green
Schedule Active. A schedule is either set by you, via the Indra App, or by your energy supplier if you are on a Smart EV / intelligent tariff.
If you're seeing red, purple or no lights at all, there may be a problem. Please visit our troubleshooting section.
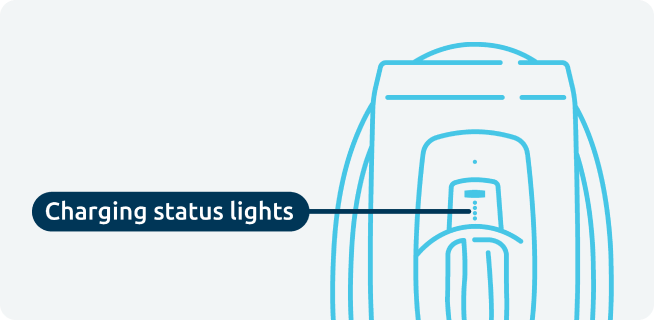
Charging status indicators
The 4 smaller white lights below are the charging status indicators. Here's what they mean:
Lights showing
What it means
- No lights
- Solid lights
Charging is available, but your EV is not accepting any power. This may be because it is already fully charged.
- All flashing
The charger is connected to your EV but it is not actively charging at this time. It may be waiting to start a scheduled charge.
Locking your charger
If you want to protect your charger from people using it without your permission, you can ‘lock’ it using the Indra App. When the charger is locked, it cannot be used, even in boost mode, until it’s been unlocked again. Simply go into the settings section of the app and toggle the ‘lock charger’ switch.
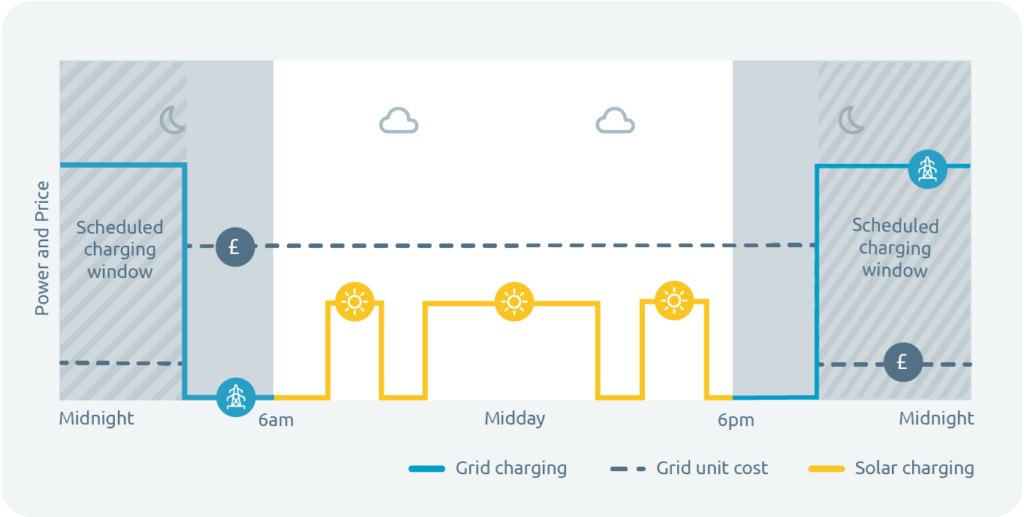
Setting up scheduling and smart charging
Use the Indra App to set up a recurring charging schedule. You can choose regular slots throughout the week and the charger will automatically start charging during those times, as long as your EV is plugged in.
The app enables you to set the times and days/nights you want to charge and also how much energy to add (by miles, kWh or amount of money).
If you have more than one electricity tariff rate (e.g. peak and off-peak), you can set up smart charging to charge your vehicle as much as possible during your lower rate period.
Your lower-rate period by itself might not give you enough time to charge your vehicle as full as you want by the time that you want it. You may need to charge during your peak rate as well. The scheduling section can show you what’s possible and when’s best to start charging.
Default schedules
Your charger will come with a default charging schedule, as required by government legislation. This schedule is designed to reduce power demand at peak times and protect the national grid. But it might not be the best charging schedule for your needs, so we recommend you set up your own schedule once your charger is installed.
Boost mode
When you need your EV to start charging right away, boost mode will immediately charge your EV. It’s handy in case your plans change, and you want to top up right away. This might not be the most energy-efficient option, but it will be the fastest.
Simply press the ‘Boost’ button on your app or on your charging point to start boost mode. (Boost mode can also be used if your charge point is not connected to the internet)
Charging to 'full'
Your EV will allow you to set the maximum charge limit of your battery, depending on your preferences. Many users only charge to 80% full, for example.
Once the EV has reached its maximum charge limit, it stops accepting any more power. Then the charger will assume the battery is full and will automatically stop charging.
It’s important to know that your charger doesn’t communicate directly with your EV, and your EV won’t tell your charger how full your battery actually is. The charger can’t override any settings your EV already has in place.
Charging time
Your charger can deliver up to 7.4kW, which is equivalent to adding around 25-30 miles of range per hour for most EVs. Charging time will be dependent on your EV battery size, for more details please refer to your car manual.
Using solar power
If you have solar panels installed at home, these can be set to supply power to your charger. The charger will take any surplus solar power that’s not being used by your home, to charge your EV. Your EV will need to be plugged in for this to happen. You may find you will only have surplus solar power during the sunnier months of the year. The surplus power needs to be higher than 6 Amps, or 1.4kW, for your vehicle to be able to use it.
If you have a charge schedule set up, your vehicle will also charge during that time window, as normal.
To use solar power when it’s available, simply click on the ‘Use solar’ switch in the scheduling section of the app. (for more details on solar please refer to our solar FAQs)
+ Safety and security
Weather-safe
Our charge points are all IP66 rated or above making them completely weatherproof.
Safety in detail
- Use the charger only as directed.
- Do not use the charger if it is defective, appears broken, cracked or is otherwise damaged or not functioning. Should this be the case, you must report the damage immediately to your installer, quoting the serial number as shown on the product label.
- Do not insert any foreign objects into the charger or its charging cable.
- Do not expose the charger or its components to open flames.
- Do not expose the charger to heating equipment.
- Do not immerse the charger or its components in water or other fluids.
- The charger should only used by the owner of the charger, or with their permission and/or supervision, and is not recommended for use by children.
- Users with implanted cardiac pacemakers or implanted cardiac defibrillators should not stand close to the charger during charging.
- The charger should be installed in a location that mitigates damage from flooding.
- Operating or storing the charger in temperatures outside its specified range, may cause damage to the charger.
- Do ensure that no water sources are above or near the charger, such as taps or sprinklers.
- Do ensure that the charging cable is correctly and neatly stowed after use, to prevent any potential trip hazards.
+ Charger Offline
Purple, flashing
The charger is having trouble connecting to the internet.
You can still charge by pressing boost on the charge point. If a schedule was created before the loss of internet connection, the charge point will continue to follow the schedule despite it being offline.
To re-establish your internet connection, please follow the steps below.
Restart your charger.
To perform a power cycle:
- Please ensure that your car is not connected to the charger
- Turn off the Residual Current Device (RCD) for the unit, this will usually be clearly labelled in the consumer unit/ fuse box.
- Leave this off for around 60 seconds to allow the unit to 'drain' completely
- Turn back on at the RCD.
- Unit should go through its booting up colour sequence, then go to a solid white light on the unit (If your unit is flashing single white or purple, this is just updating telemetry and should shortly return to solid white).
After doing this, allow up to 15 minutes for the charge point to re-establish connection to the internet and return to a solid white light.
If you know your charger is using Wi-Fi to connect to your router, you might need to pair it again. To do this, please follow the steps outlined below:
- Reboot your Wi-Fi router. If your router has a reset button, use this or, alternatively, switch it off at the mains for at least 1 minute.
- Once boosted back up, locate the WPS button on your router. It is typically found on the front or back panel of the router. Press the WPS button once and wait for a few moments. Most Wi-Fi routers will indicate it is WPS mode by changing the colour of the LED display.
- On your EV charger, press and hold the boost button for 11 beeps- the main LED should go green before starting to flash orange.
- Allow the unit some time to establish a connection. Once connected, the LEDs on the unit will flash a single white light. Please refrain from interrupting this step and wait until the data has caught up.
- Once the data has caught up, the unit should return to a solid white LED. This indicates that your EV charger has successfully reconnected to the Wi-Fi network.
What to do next